As promised, here's the second part of my Bird Unit Pack for your little ones! Enjoy!

Oh and don't forget to download the first part as well :)
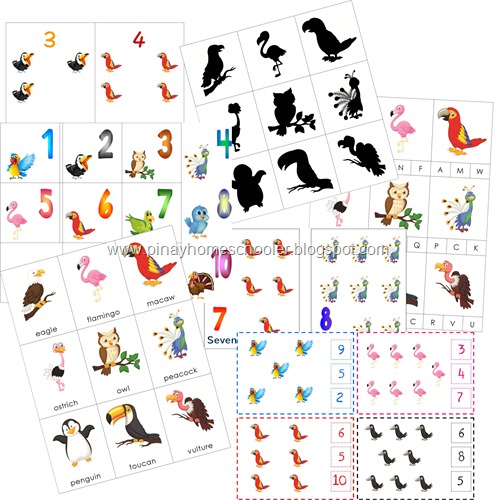
Thank you once again!


As promised, here's the second part of my Bird Unit Pack for your little ones! Enjoy!
Oh and don't forget to download the first part as well :)
Thank you once again!
Son's request was for us to have another bird unit (click here for our previous lessons). So here are the activities and materials I have gathered for this week's unit study.
Bird Nomenclature and Definition Cards. Whenever we study animals, I always start by introducing the different parts of the animals and how they function. I just have to say we've been using 3 part cards method and it has accelerated my son's reading.
Following the nomenclature and definition, my son always works with the activity sheet identifying the parts. Here he can make his own booklet of bird parts using colored pencils and crayons.

Bird parts booklet. This method enables my son to practice his spelling and a much deeper understanding of the bird parts.
Bird species matching. I provided bird pictures in the my Bird Pack which we use to identify the different species of birds. We use our Safari Toob bird collection (and Schleich too).
Bird's feet classification. I made a table of the different types of bird's feet and list down the bird (figures) that we have. This activity aims to identify the the bird's habitat and lifestyle.
Similarly, I printed out a picture of the different shape of the bird's beak from here. With this activity Mavi will be able to tell what the birds eat. This activity was inspired by this one.


Bird's colors. Because Mavi loves to color, I collected these images from the web. The aim of this activity is for Mavi to color the birds based on our figures.

The nomenclature cards, definition and bird cards were also from the Bird Pack. Click the image below for the link.
For more FREEbies and learning aids, please check The Pinay Homeschooler Shop and Downloads.
Linking to:
Montessori Monday
TGIF Linky Party
Teach Beside Me
Preschool Corner
Teaching Mama
I Can Teach My Child
Home + School = Afterschool!
Sharing with you the conclusion of our Bird Study Unit which we started a last week.
You can read about the first part here.
Activities related to our study can be found here and here.
Bird's Beak. Now this is a new activity which we didn't touch last year. It was way advance for a 3 yrs old but now that my son can grasp complex information, I decided to introduce this to him. I got the picture from The Visual Dictionary, it shows some of the different sizes and shapes of a bird's beak. Based on what we have learned from our Bird Parts Definition booklet (Bird Pack), the beak or bill is used mostly for grooming, protection and how birds catch and eat their food. Some are long so they can catch foods in the water, some are short because they mainly eat soft fruits and some can be sharp as they are used to hunt other birds and animals.
So we used our bird figures again to examine the different beaks. These figures are from Safari Toob and Schleich... I have been collecting them for years as my son loves animals and they're learning materials.
Bird's Feet. We also talked about the different shapes of a bird's foot. They are designed to be different are birds live in different habitats. Like birds living in water have webbed feet for swimming, those living in trees have sharp claws etc. Again, I printed out the picture seen below from here.
I also used this information in our discussion. You can get this from Science Buddies.

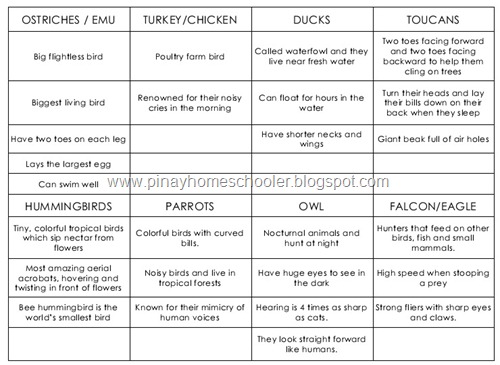
Next, we talked about different types of birds. The picture cards (nomenclature cards) are included in my Bird Pack which you can get from here. We talked about the unique features and characteristics of each.
This is how we differentiate each one (see picture below). By using a printable bird facts, we were able to learn how each one differs from another.
You can download this file for FREE from here.
I love how my son is eager to learn about these birds!
Bird's Nest. We were supposed to make a nest out of twigs and leaves in the backyard. But it rained for days and I had a flu bug, so we ended up making some nest indoors LOL.

Linking to:
Montessori Monday
TGIF Linky Party
Teach Beside Me
Preschool Corner
Oh the weather is just so wonderful today that we decided to skip indoor activities (read our Bird Study Part I) and do some bird watching and look for some bird's nests :)
And look what we found along the way, feathers!
Hoping to visit the port this weekend so we can see some gulls too!
Linking to:
Montessori Monday
TGIF Linky Party
Teach Beside Me
Preschool Corner


We had a Bird Study last week and the printable material that we used is now up and available.
(Click the picture for the link)
The Bird Pack contains 12 parts of the bird nomenclature card and booklet.
- 12 picture cards
- 12 labels
- 12 control cards
- 16 bird cards (3 part cards)
- bird activity sheets
- title cards
We used the bird cards for matching with our bird figures (Safari Toobs and Schleich).
We also used them to discuss the different kinds of birds.

And the booklet comes in handy when we discuss the different parts of the bird. As we talk about each part, we place a label on the bird puzzle as shown on the picture below.

Hope you like it! Enjoy!
Mavi is 38 months old.
Activities we did last week:
LANGUAGE

We had Bird unit this week.
Practice reading via Word Family Strips.
MATH
Learning how to use a ruler and played a bunch of measuring games.
Grid game using chicken grids which I downloaded from the net. I had this for a long time and I totally forgot the link!
CVC word recognition using stamping game.
Skip counting using stamping game.
I laid out a roll of paper on the floor and made him connect the numbers :) Something to keep him busy for an hour. Here he is figuring out how he can connect all the the numbers hehehe. I love to see him concentrate!
My son currently undergoing a phase of being obsessed with writing numbers and letters.
SCIENCE.
We studied the life cycle of a chicken.
And the parts of the bird.

OTHERS

Practice coloring using do-a-dot markers.
Learning how to write words. Can you see the word CARROT? He prefers writing in uppercase letters.
Creating colorful images using do-a-dot markers and kitchen towels.
I’m linking this to:


